What to Wire Before the Drywall Goes Up: Low Voltage Planning for Toronto Renovations and New Builds
When a Toronto home is open to the studs, every cable and drop costs a fraction of what it will later. Here is what to plan, what to run, and what almost every renovation misses.

When a house is gutted to the studs or built from scratch, there is a narrow window where every cable, drop, and infrastructure decision costs a fraction of what it will cost later. Most homeowners miss it entirely — not because they don't care, but because their general contractor or electrician never raised it. The result is a finished home that looks great but can't support proper Wi-Fi, has no wiring for security cameras, and needs expensive retrofitting the moment the owner wants more than a basic internet connection. This guide covers what low voltage wiring during a home renovation in Toronto actually involves, what gets missed on nearly every project we walk into, and how to plan structured wiring properly from the first stud to the final trim.
Why do most renovated homes in Toronto have no network wiring?
Because the people running the project don't specialize in low voltage.
Most general contractors and electricians focus on what they know — panels, outlets, and fixtures. Network infrastructure is a different trade. Many still assume that because devices connect wirelessly today, there is no need to run cables. That logic is backwards. Wi-Fi still depends on physical wired access points connected to a network. With no planned cable runs, there is no infrastructure to support proper wireless coverage, AV integration, or smart home functionality. We regularly walk into newly renovated homes over 3,000 square feet without a single network drop. Planning structured network wiring early is what prevents that.
When is the right time to run low voltage wiring during a renovation?
After electrical, plumbing, and HVAC are done — but before drywall.
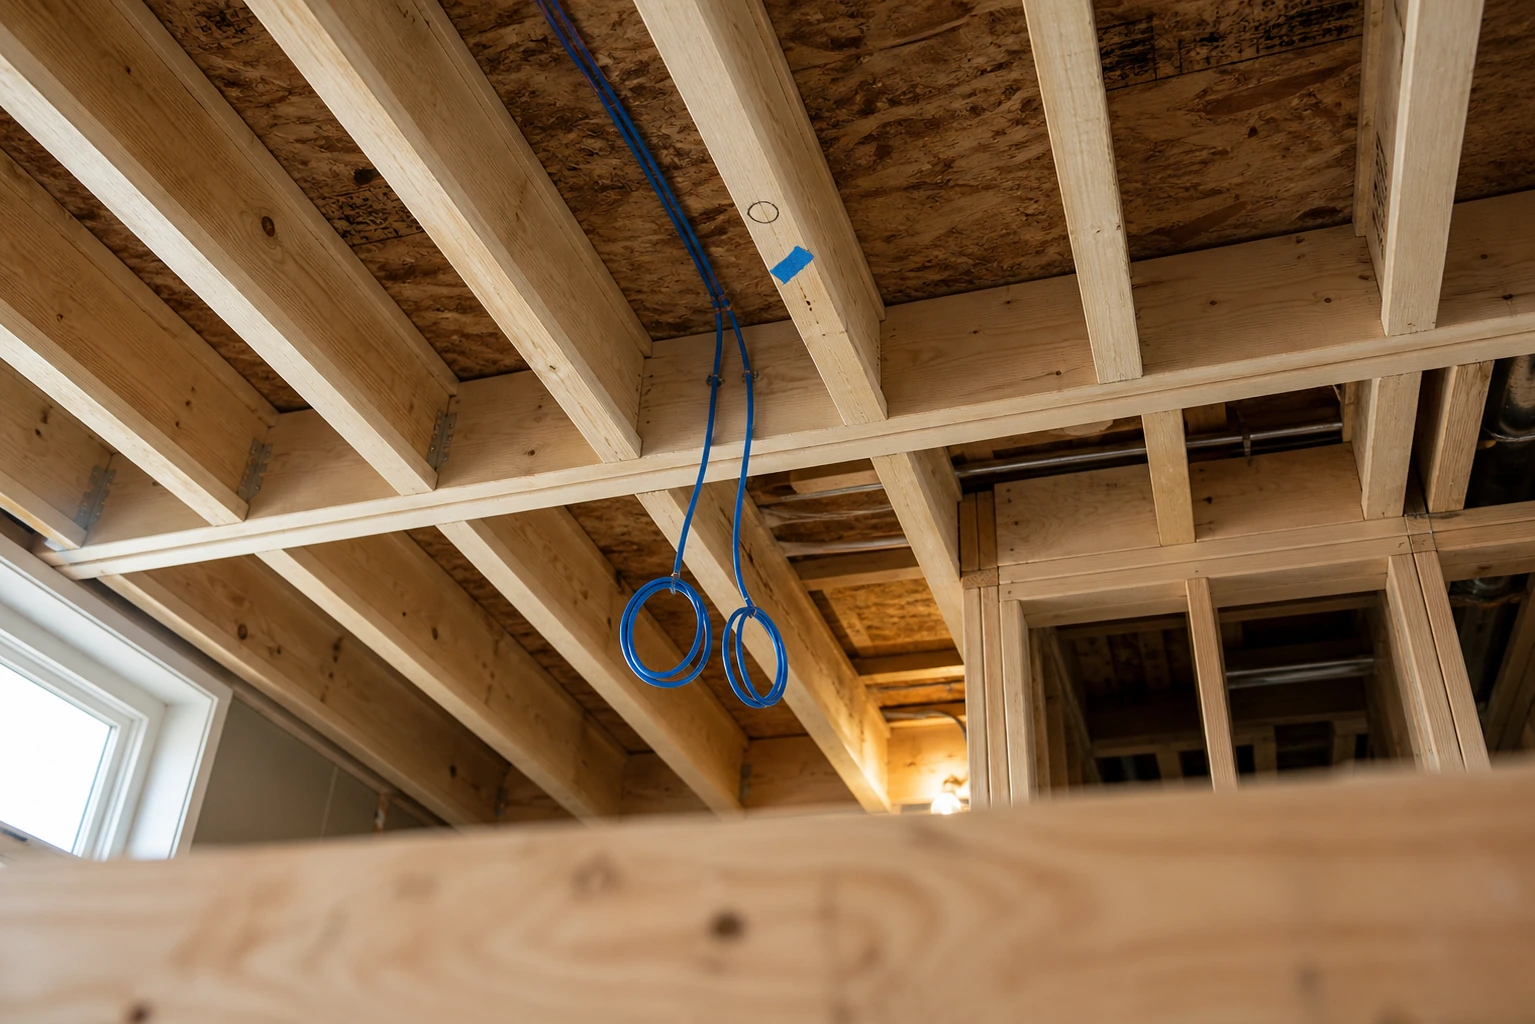
There is a specific window during construction that makes low voltage wiring straightforward and affordable. Once the electrician, plumber, and HVAC trade finish their rough-in work, the walls are still open and every run is a clean, unobstructed pull. This is Stage 2 of our process. Running ethernet wiring before drywall keeps costs low, preserves clean routing paths, and reaches locations that become completely inaccessible once the walls close and finishes begin. Miss this window and the same wiring becomes a retrofit job.
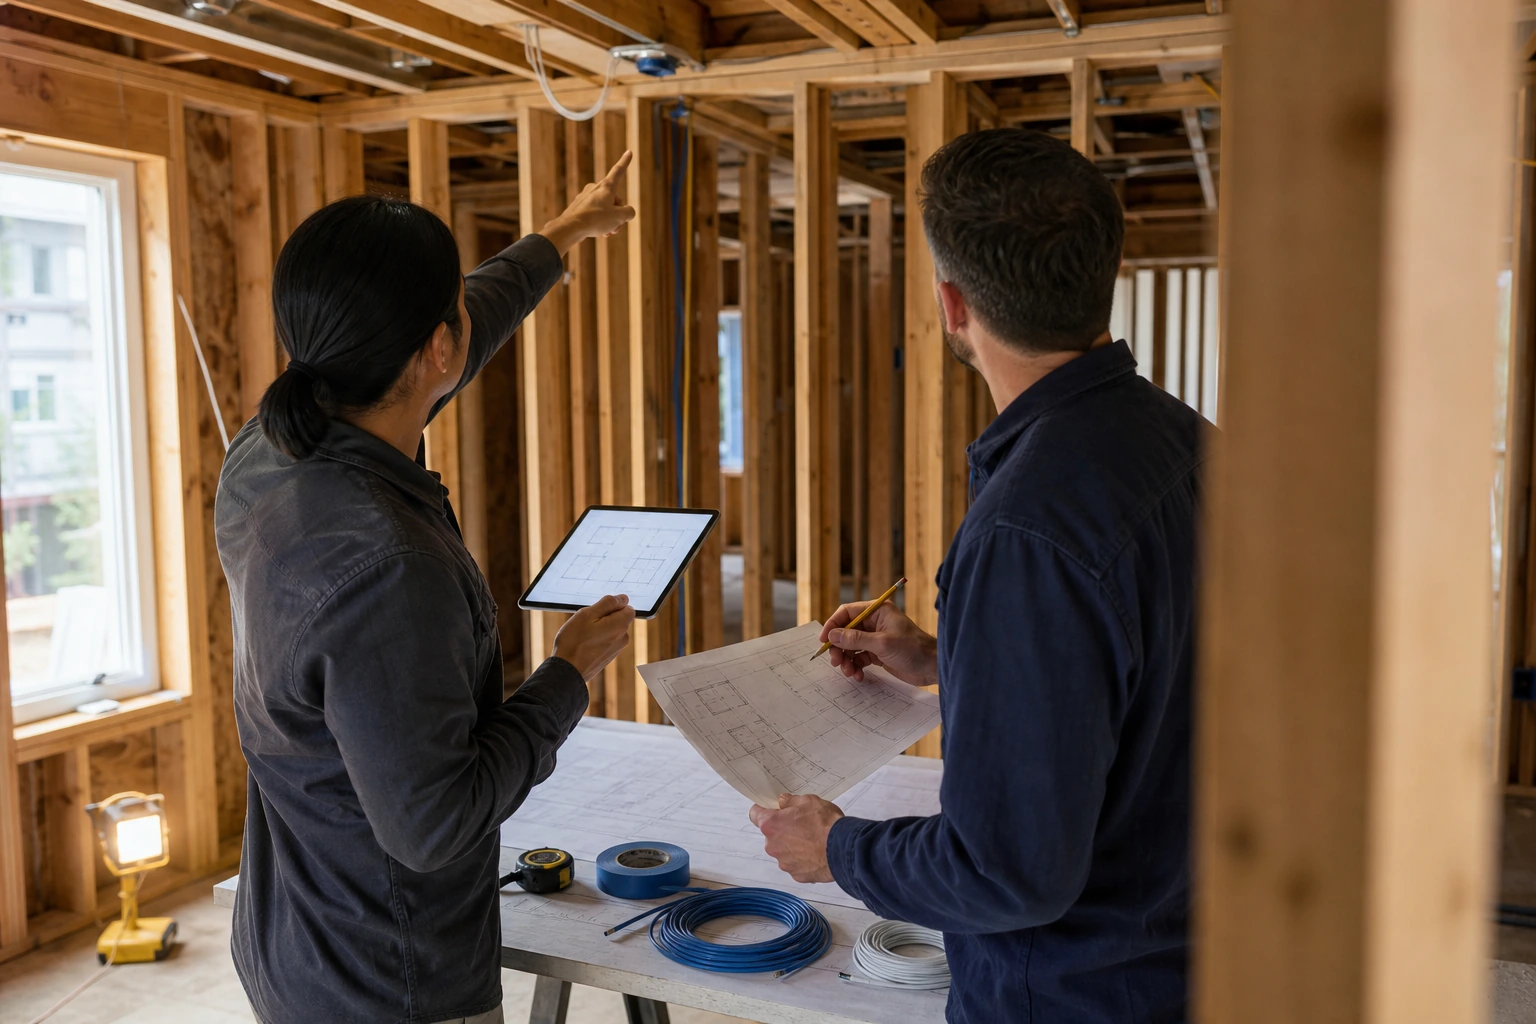
Should I hire a low voltage company even if my contractor is running the wires?
Yes — at minimum, hire a specialist for the consultation.
Even if your contractor or electrician plans to handle the wiring themselves, bring in a low voltage company for the planning phase. This is Stage 1 of our process. We walk the house with the owner and contractor, identify every location that needs a run — access points, security cameras, TV zones, audio, gaming areas, outdoor coverage — and document a plan before a single wire is pulled. This low voltage pre-wire consultation in Toronto costs $200 per hour and consistently saves homeowners from expensive mistakes later. When this step is skipped, the same problems repeat: cables land in the wrong rooms, outdoor areas get no coverage, and the homeowner pays far more to correct it after the fact. A structured wiring consultant earns the fee in avoided rework alone.
How much does it cost to run cables during a renovation versus after?
During open-wall construction, cable runs start at $120. Retrofitting can cost several times more.
When walls are open and studs are exposed, a single cable run starts at approximately $120, varying by length and cable type. Once drywall is installed and finishes are complete, the same run means fishing through walls, patching drywall, and working around finished surfaces — costs that can climb well over $1,000 for one cable in a complex retrofit. The pre-wiring cost math during a renovation is straightforward. Running wires while the framing is open — even to locations you are not certain you will use — is almost always cheaper than deciding later that you need them.
What cables should be run during a home renovation or new build?
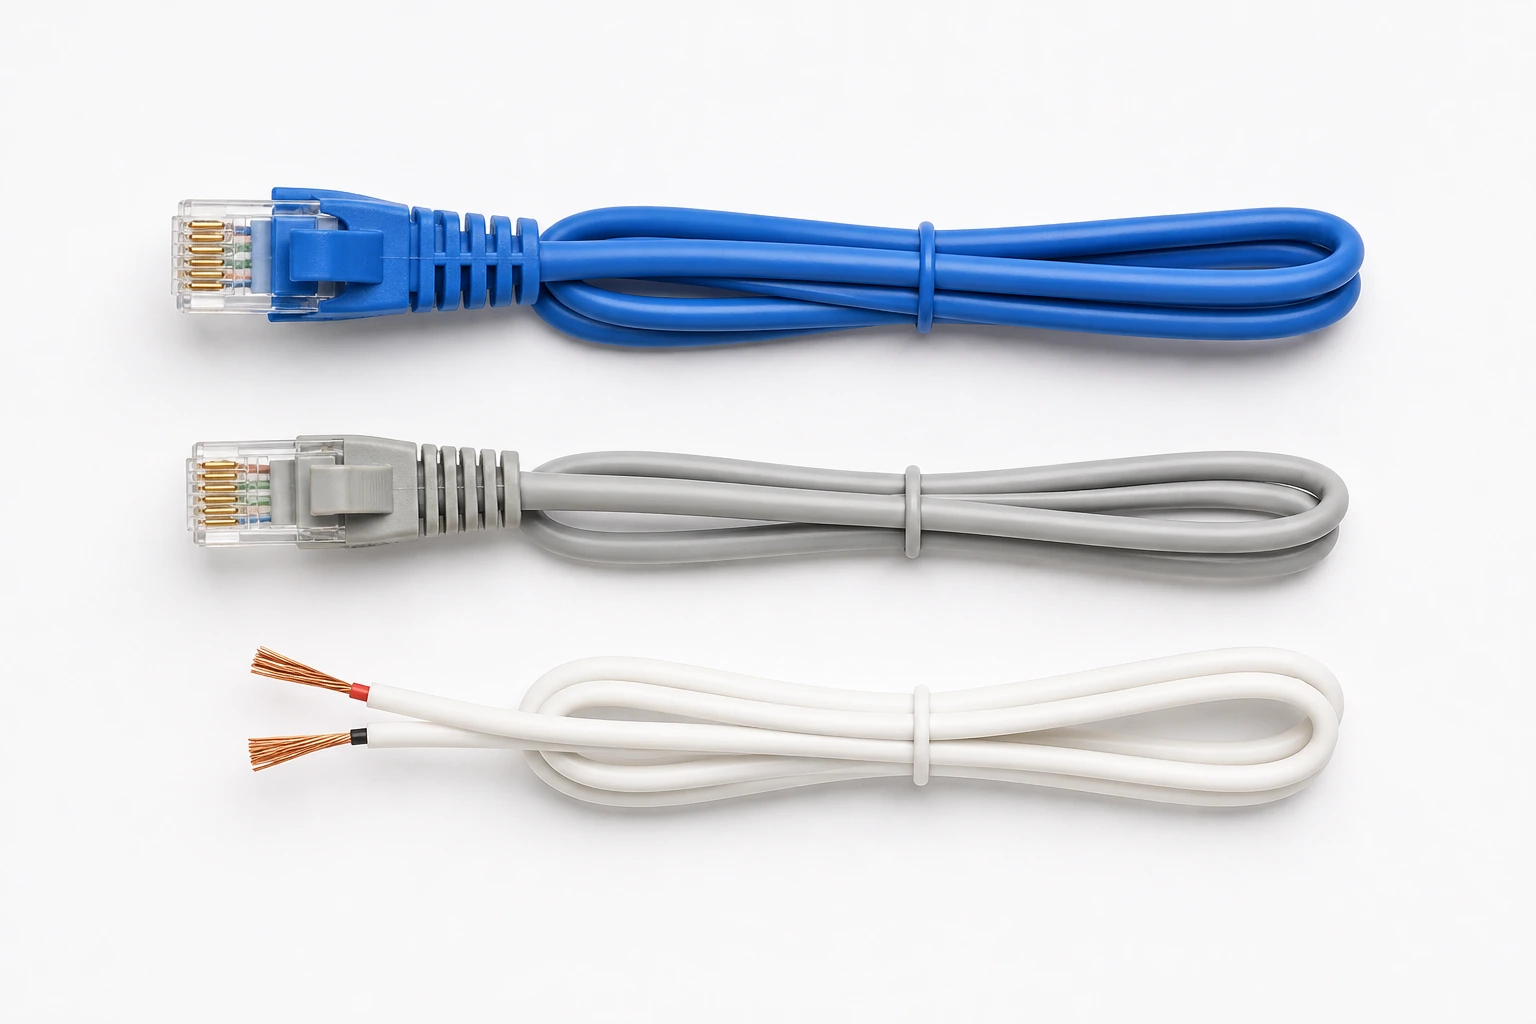
Cat6 for access points and network drops. Cat5e for security cameras and doorbells.
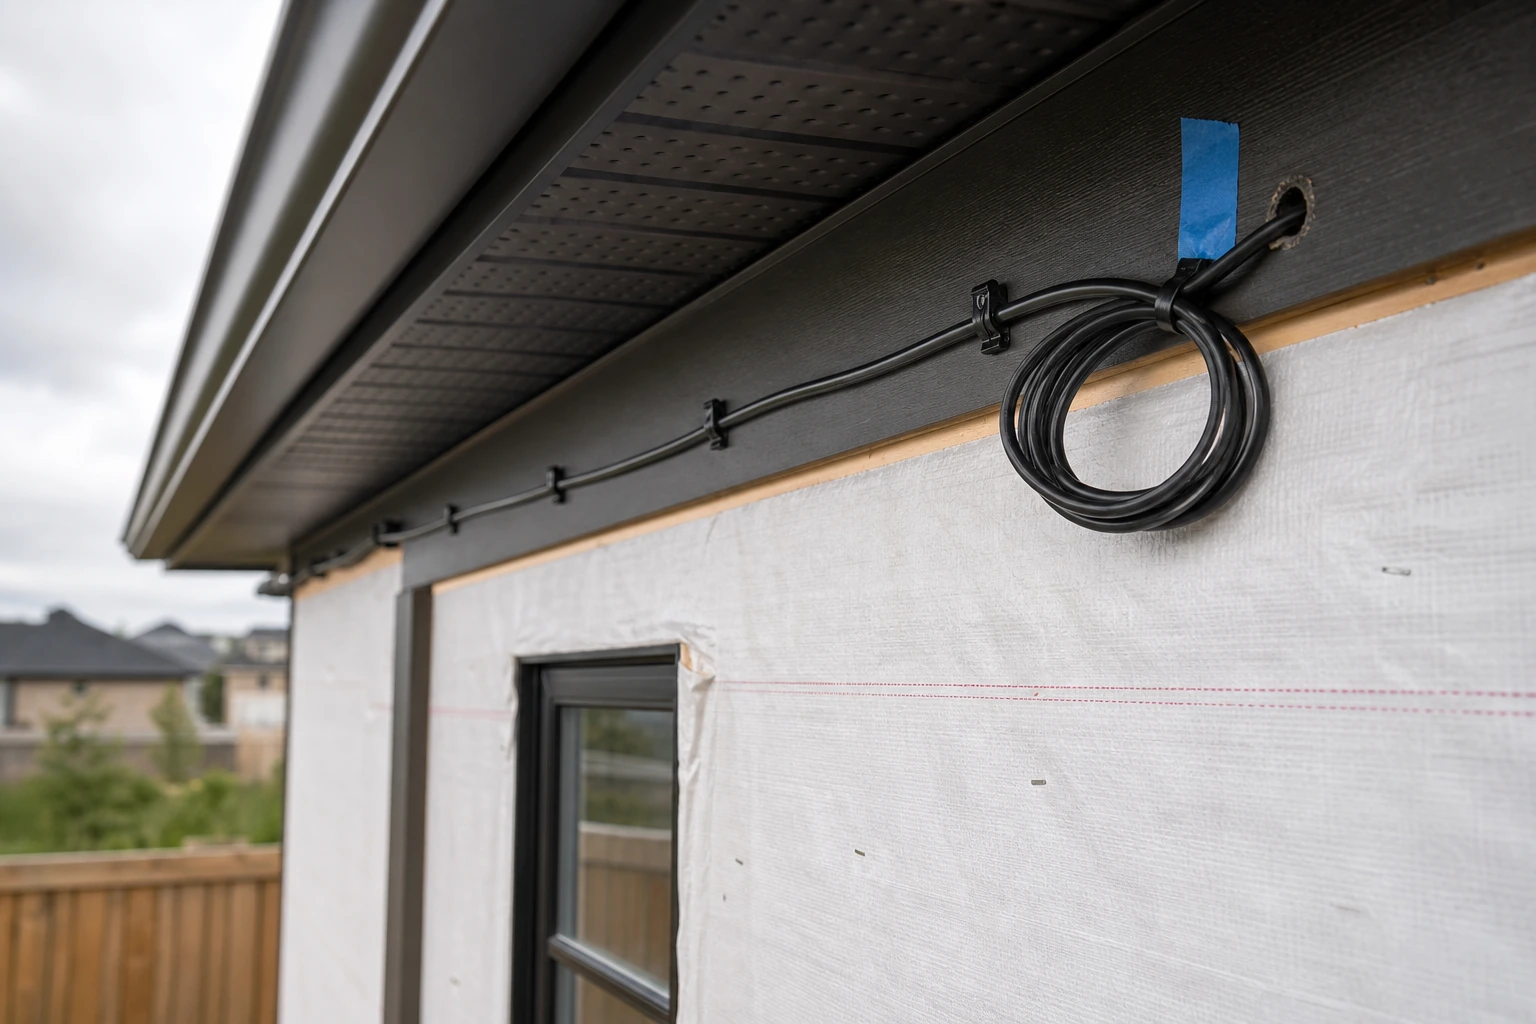
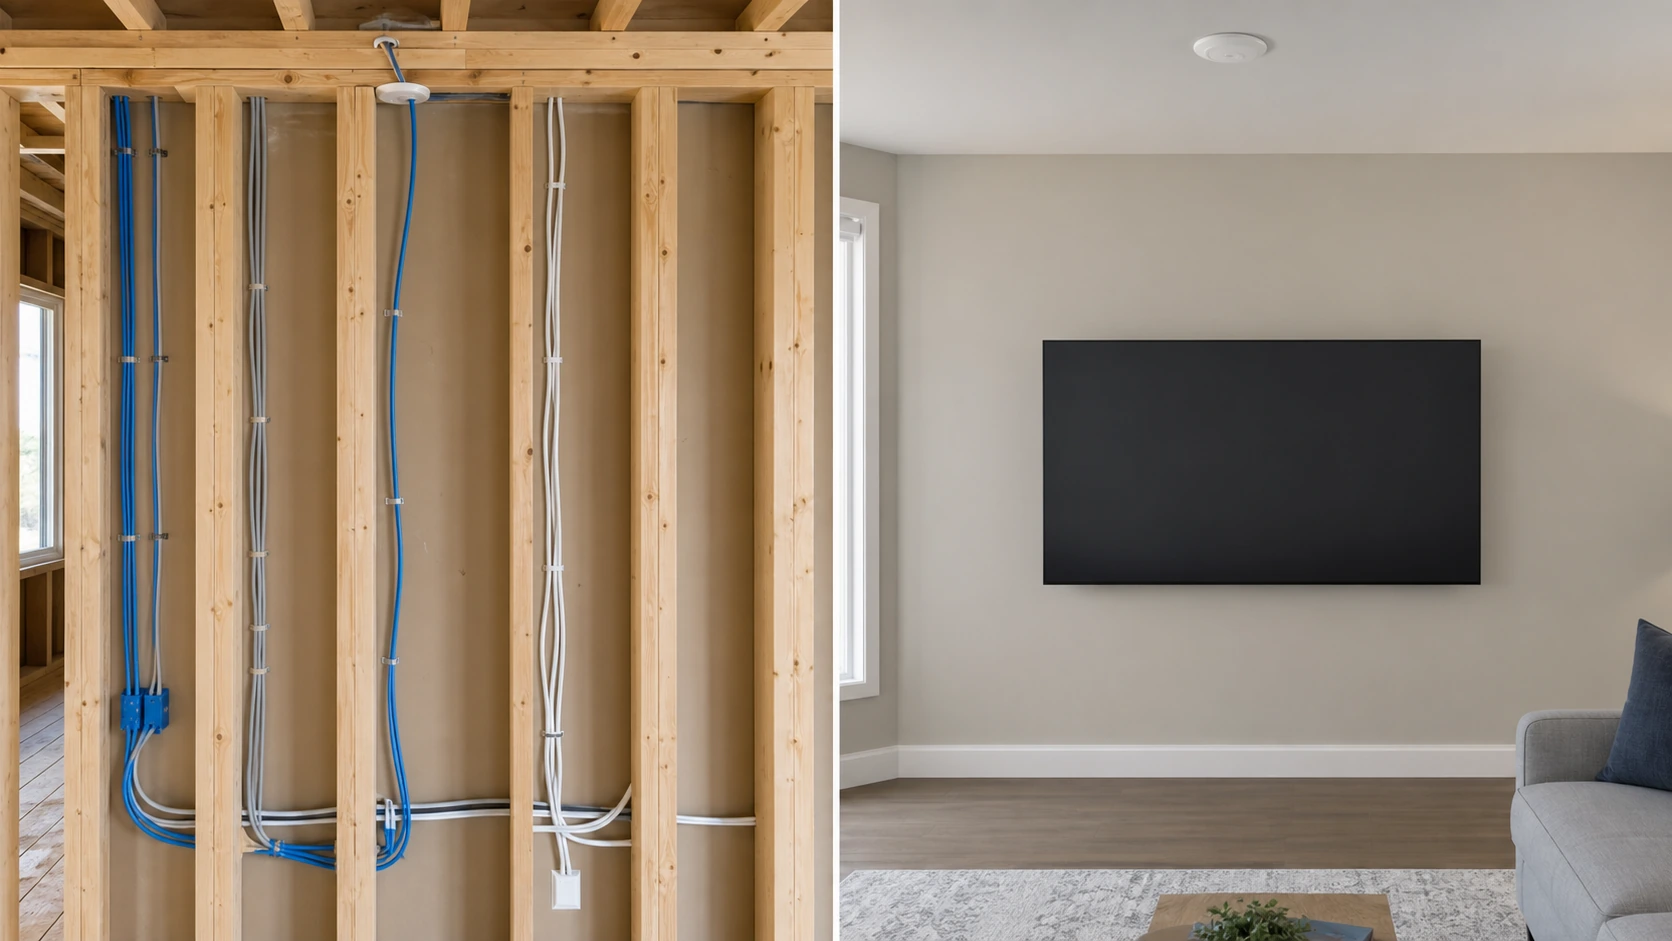
Cable type matters. For Wi-Fi access points and any network drop, we use Cat6 exclusively, which is the right standard for cat6 wiring in new construction. Cat5e is still sufficient for IP security cameras and doorbells, so spending on Cat6 there is unnecessary. For critical access point locations, we run two cables per drop — a redundancy that protects the Wi-Fi if one cable is damaged during construction. Drywall screws and staples from other trades damage cables on roughly 5% of runs. A second cable at a 50% premium is cheap insurance against losing a Wi-Fi zone entirely. For outdoor runs, we use outdoor-rated direct burial Cat6 cable, designed for permanent outdoor installation in all weather conditions.
What to run before the walls close
- Cat6 — Wi-Fi access points and all network drops (two cables to every critical access point)
- Cat5e — IP security cameras and doorbells
- Outdoor-rated direct burial Cat6 — exterior camera and access point runs
- Two-conductor in-wall speaker wire — current and future speaker locations
Where should network cables be run in a house during construction?
Access points in ceilings, workstations and gaming areas hardwired — everything else relies on Wi-Fi.
Not every room needs a dedicated drop. Today, the vast majority of devices are built to work on Wi-Fi. The locations that genuinely benefit from a hardwired connection are: ceiling drops for wireless access points, home offices with workstations, rooms with gaming consoles, and anything with low-latency requirements. Control4 keypads, touchscreens, and integrated AV equipment also benefit from a direct connection. TV locations typically warrant two to three Cat6 cables — these can carry HDMI extender signals, audio, infrared, and control data beyond just internet. That is the core of sound home network planning for a new build. Everything else can rely on a properly designed Wi-Fi system.
How should Wi-Fi access points be placed in a new build or renovated home?
Ceiling-mounted, staggered by zone — never stacked directly above each other.
Ceiling mounting is the correct approach for residential Wi-Fi access points, and installing an access point in the ceiling produces consistent downward coverage across a floor. The most common mistake we see is placing access points directly above each other on each floor — basement, main, and upper. That stacking creates channel interference and leaves large parts of the home with weak coverage. The honest answer to how many access points you need in your house depends on square footage, layout, and wall construction, but the planning rule is constant: stagger placement to avoid vertical overlap, and route ceiling-mounted access point drops to discreet spots — inside linen closets, walk-in closets, and service areas — rather than the centre of a hallway ceiling. Pairing the cabling with a properly planned Wi-Fi optimization design is what turns drops into coverage. Our resource on why custom homes need wired access points goes deeper on the placement logic.
Do I need conduit for home network wiring during construction?
Generally no — but one conduit run from the equipment room to the attic is worth doing.
High-quality Cat6 cable installed properly performs reliably for decades without conduit. Conduit adds cost and complexity that is rarely justified for residential installs. The one exception: a conduit from the main distribution area — where the network rack or panel lives — up to the accessible attic. That single run creates a future access path for cable replacement or upgrades without opening walls. Beyond that one run, conduit is usually unnecessary.
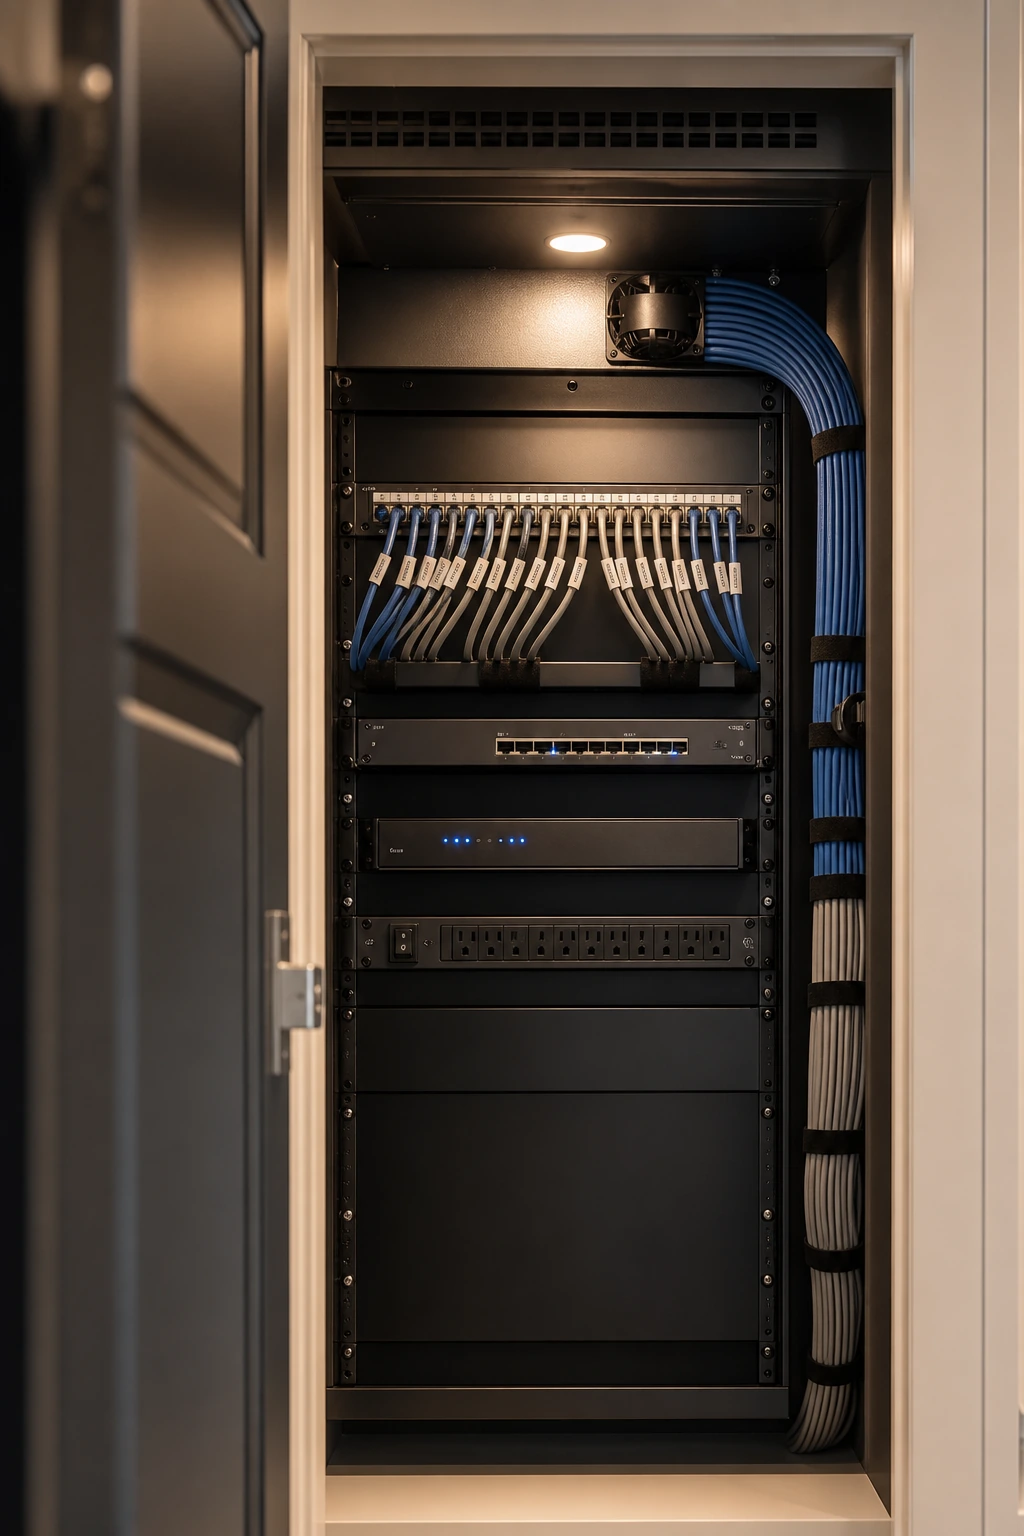
Where should the network equipment room be located in a renovated home?
A dedicated, dry, accessible space with room for a proper rack — not the furnace room.
The location of the main distribution point matters. We regularly find homes where a contractor routed every cable to the furnace room — a cramped, humid space shared with water heaters and mechanical equipment. Electronics and moisture do not coexist well, and there is rarely room for a proper rack or panel. The distribution point should be a dry, ventilated space with enough room to mount equipment cleanly, manage cables, and allow future additions. A dedicated media closet, utility room, or structured panel location near the centre of the home is the right call.
Should I run speaker wire during a home renovation even if I don't plan to use it?
Yes. In-wall speaker wire costs very little to run during construction and a lot to add later.
Audio distribution is one of the most frequently skipped categories during renovation planning. Many homeowners assume they don't need in-wall speakers — until they want music in the kitchen, dining room, or primary bedroom a few years later. At that point, running in-wall speaker wire through finished walls is expensive and often not possible without major disruption. Running two-conductor speaker wire to future speaker locations costs very little during the open-wall phase. The wire sits dormant until it is needed — whether that is a future Sonos system or a built-in home theatre. Our guide on home theatre pre-wiring covers the audio rough-in in detail.
What is the three-stage process SetupTeam uses for low voltage wiring on renovation and new build projects?
Consultation, rough-in wiring, and final installation — in that order.
Three stages keep a low voltage project on track from framing to move-in. Each stage has a clear job, and skipping the first is where most problems start.
Stage 1 — Consultation and Planning
We walk the property with the homeowner and general contractor. Every location is assessed: access points, security cameras, TV zones, audio drops, gaming areas, outdoor coverage, and control system requirements. We document the plan and confirm cable types and routing paths. This stage is billed at $200 per hour.
Stage 2 — Rough-In Wiring
We arrive after electrical, plumbing, and HVAC have completed their rough-in work, but before insulation and drywall. All cables are pulled and staged. Critical runs receive redundancy cables. Outdoor runs use direct burial rated cable.
Stage 3 — Final Installation
We are the last trade in the house. Once the homeowner moves in, we return to terminate cables, mount equipment, configure the network, wall mount TVs, connect speakers, and commission the full system.
Should security camera wiring be planned during a renovation even if I'm not sure I want cameras?
Yes — the cost of running the wire now is a fraction of what retrofitting costs later.
IP security cameras typically run on Cat5e, which is inexpensive and easy to pull during open-wall construction. The decision of whether to install cameras can wait. The cable can't. Once drywall is up and finishes are complete, adding security camera wiring to exterior corners, garage entries, and backyard zones becomes a major project. For exterior positions, this is where outdoor-rated cable for security cameras earns its place. Doorbell wiring follows the same logic. Planning the runs now keeps a future security camera installation simple.
Walls still open? Plan the low voltage wiring now.
Book a pre-construction consultation while the framing is exposed and we'll plan every cable run, access point, and the equipment room to spec — before drywall closes. Starting at $200 per hour.
Frequently Asked Questions
7 answersTechnically yes, but low voltage planning requires a different skill set. Electricians are licensed for electrical work. Low voltage planning — Wi-Fi distribution, access point placement, camera coverage zones, and AV integration — takes specific knowledge of how these systems work together. Most electricians don't plan structured wiring the way a dedicated low voltage company does. At minimum, bring in a specialist for the consultation before any cables are pulled.
If it's the only cable to that location, that zone is effectively lost. Screws, staples, and heavy foot traffic from other trades damage cables during construction at a meaningful rate. For critical infrastructure like a Wi-Fi access point, losing a single cable means losing coverage in that zone. This is why we run two cables to every access point and critical location — the second cable costs about 50% of the first and provides full redundancy.
Cat6 for access points and network drops. Cat5e is sufficient for cameras and doorbells. Cat6 is the correct standard for new network infrastructure and Wi-Fi access points. It supports higher bandwidth, lower crosstalk, and longer reliable runs. For IP security cameras and doorbells, Cat5e performs well, so using Cat6 for those is unnecessary spending.
No. Strategic placement based on actual use beats running cables everywhere. Running ethernet to every room adds cost without proportional benefit. Modern Wi-Fi — planned with ceiling-mounted access points staggered to avoid interference — delivers reliable coverage throughout the home. The locations that genuinely benefit from a hardwired drop are access point ceiling positions, home offices, gaming areas, and AV equipment. That, not a drop in every room, answers how many access points and cable runs you actually need.
SetupTeam charges $200 per hour for pre-construction consultation. The consultation covers a full walkthrough of the property with the homeowner and general contractor. Every low voltage system is assessed: network, Wi-Fi, security cameras, audio distribution, AV zones, and smart home integration. The output is a documented plan. For most homes, the consultation takes one to two hours.
A dry, ventilated, accessible room — not the furnace room or a mechanical closet. All cable runs terminate at a central distribution point housing the network switch, router, patch panel, and any AV equipment. This room should be dry, have adequate ventilation, and have enough physical space for a proper rack or structured panel. Furnace rooms and cramped mechanical spaces are not appropriate.
You need at least one cable reaching an outdoor access point or exterior wall location. Outdoor Wi-Fi requires a cable run to the exterior or to a spot that covers outdoor zones. This is one of the most commonly missed pre-wire items. During construction, routing a cable to a backyard soffit, deck overhang, or garage exterior is straightforward. If outdoor coverage is even a possibility, plan and run the cable during the open-wall phase.
Planning a renovation or new build in Toronto or the GTA?
The best time to plan your low voltage infrastructure is before a single cable is pulled. SetupTeam offers pre-construction consultation starting at $200 per hour — the planning that keeps a future network installation clean and complete.
Call us at (647) 464-0606 or get in touch below.